Making Swift Code More Swifty And An MVVM Aside
At May's Denver Swift Heads meetup, Vui Nguyen gave a great presentation on completing an interview algorithm puzzle. Her intro to the talk is paraphrased better than I can:
There's a job you want to apply to, but it requires writing a software program. And (gasp!) the software program requires developing an algorithm to solve a puzzle or challenge. How do you go about doing that?
Vui shared with us her implementation of the problem, as well as the process she went through to get there. We'll look at her original Swift implementation, and then do some analysis to see if we can improve the implementaiton by decreasing the runtime complexity, and making the code more Swifty.
I'm not simply attempting to find flaws in Vui's implementation since it's already correct. In fact, Vui's implementation was good enough to get her a couple of interviews for the job she applied to, which was the whole point of writing this program. Rather, I was inspired by her app, and wanted to use it as an exercise in taking some Swift code and seeing how we can improve it.
Problem Statement
The problem is essentially to find an inverse hash function for a given hash function with some hints as to the inverse hash's behavior. Vui did the hard work of finding this inverse hash (referred to hereafter as the "reverse hash") in her original implementation.
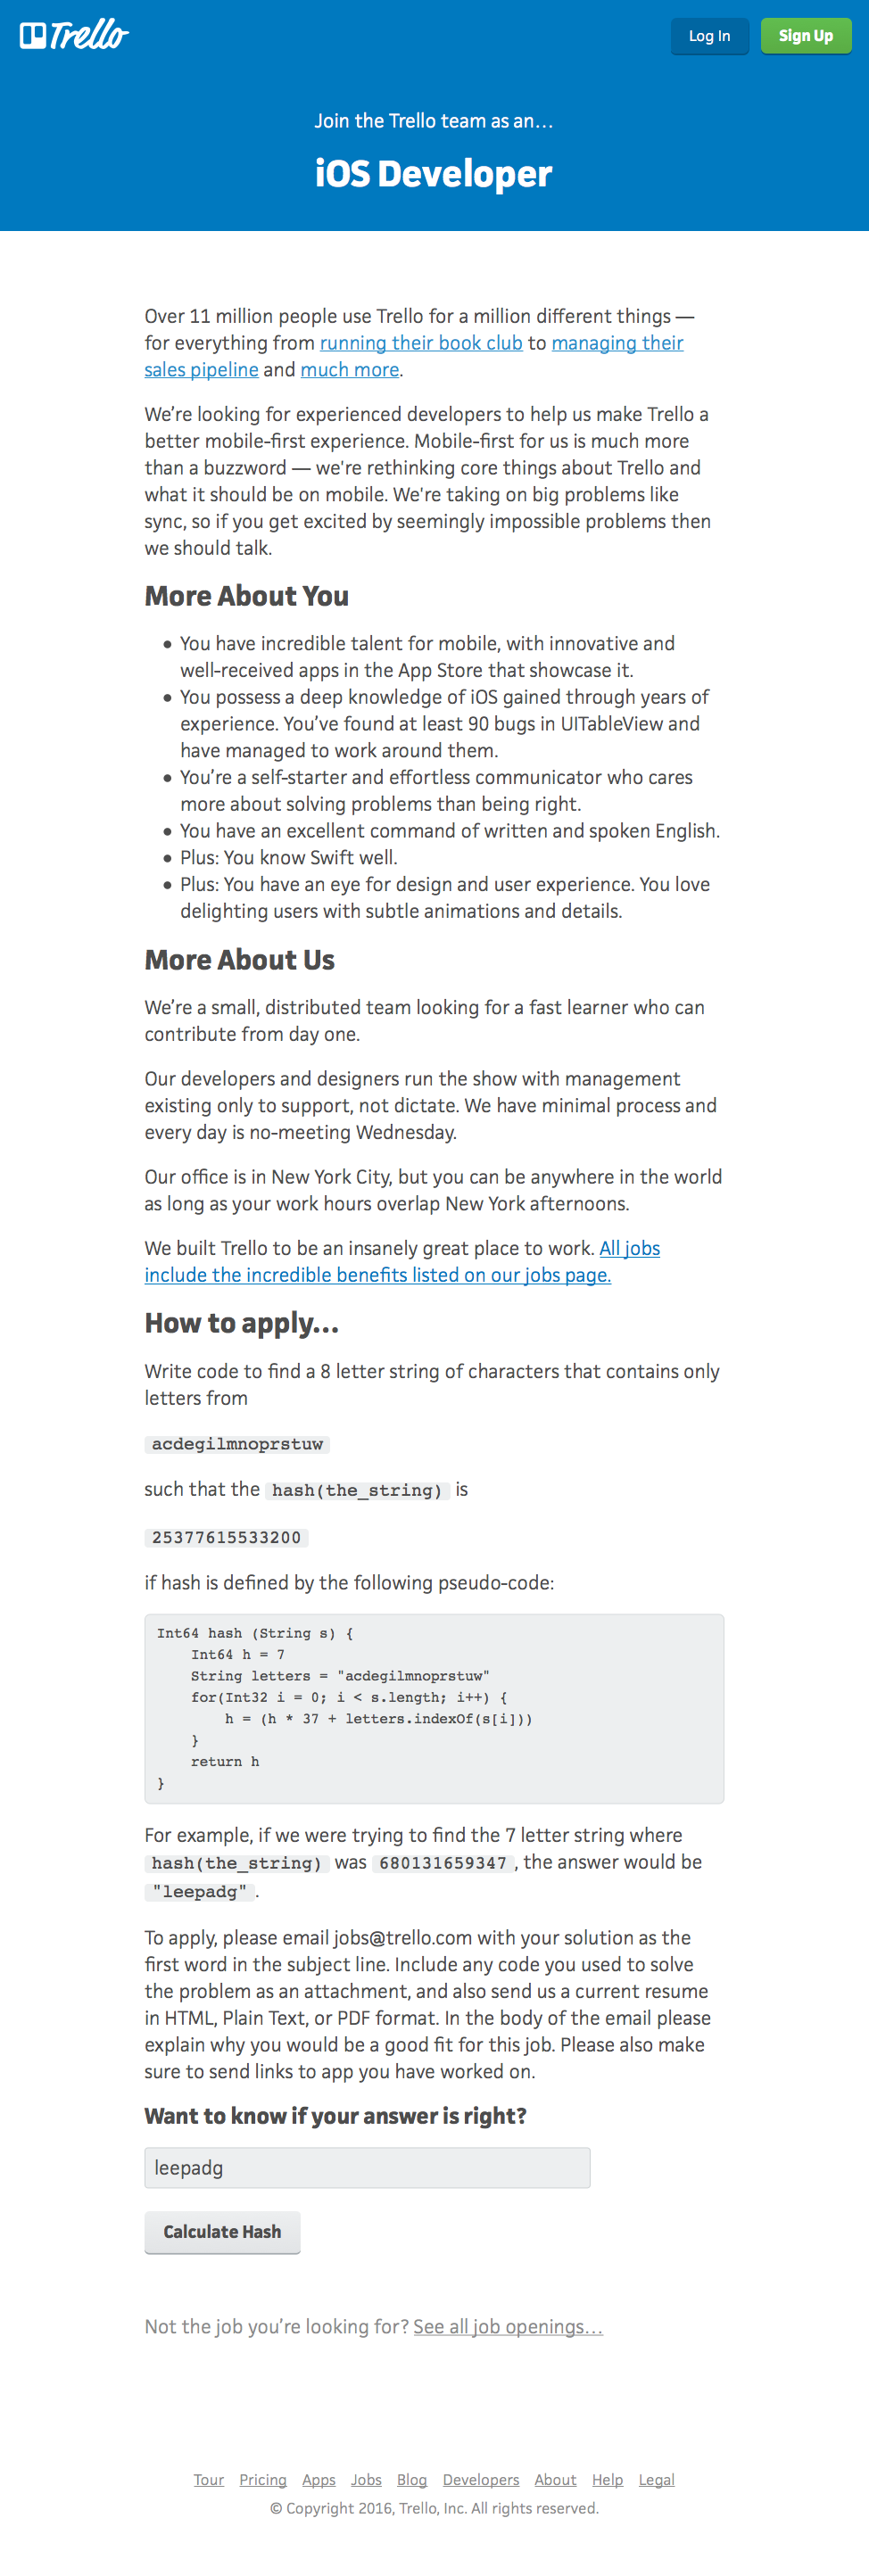
Original Implementation and Analysis
The original implementation is given as a playground, which is a great way to tinker with and perfect algorithms, and a functioning iOS app. We're currently most interested in the algorithm, so we'll start with that.
The original implementation includes a Swift version of the hash function, in addition to the reverse hash. Let's look at the reverse hash below (I've removed some print statements for brevity):
func reverseHash(hashie:Int64, wordLength:Int) -> String
{
    let letters:String = "acdegilmnoprstuw"
    let thirtySeven:Int64 = 37

    var remainders = [Int64]()
    remainders.insert(hashie, atIndex: 0)
    var remainder = hashie
    for i in 1..<wordLength+1 {
        remainders.insert(remainder / thirtySeven, atIndex: i)
        remainder = remainders[i]
    }

    var reversedString:String = ""
    var resultString:String = ""
    var letterIndex = 0
    for i in 0..<wordLength {
        letterIndex = remainders[i] - (remainders[i+1] * 37)

        let lettersStringIndex = letters.startIndex.advancedBy(letterIndex);
        resultString.append(letters[lettersStringIndex])
    }

    reversedString = String(resultString.characters.reverse())
    return reversedString
}
Calling this function is simple:
reverseHash(680131659347, wordLength:7) // correctly returns the string "leepadg"Looking through the code, we can see that this is fairly straight forward procedural style Swift. Doing some quick runtime complexity analysis, we have two flat loops over wordLen and a call to characters.reverse(). It doesn't appear we're doing any implicit looping within the loop bodies, so we're roughly in the O(3N) range. However, wordLen in the example is given as 7 and 8, so it's not likely that improving the runtime is a) easy or b) necessary for this exercise.
Improvements
Otherwise, in terms of syntax we immediately see some (perhaps) redundant type information, inconsistent typing, and unnessesary variables:
let thirtySeven:Int64 = 37
// not required to be a variable
// we could just use 37 or call the variable "divisor":
let divisor: Int64 = 37

var remainders = [Int64]()
remainders.insert(hashie, atIndex: 0)
// can more Swiftly be declared as:
var remainders: [Int64] = [hashie]

var reversedString:String = ""
// the String type can be inferred:
var reversedString = ""
Additionally we can improve the ranges used to loop over wordLen, and also eliminate the need to reverse the characters as a last step.
The first loop body can be improved by simply referencing the previous element in the array, and using the closed range operator instead of the half-open operator:
var remainders = [Int64]()
remainders.insert(hashie, atIndex: 0)
for i in 1..<wordLength+1 {
    remainders.insert(remainder / thirtySeven, atIndex: i)
    remainder = remainders[i]
}

// Becomes

var remainders: [Int64] = [hashie]
for i in 1...wordLength {
    remainders.append(remainders[i-1] / 37)
}
The second loop body can likewise be improved to eliminate the need for some var declarations and the ultimate reverse:
var reversedString:String = ""
var resultString:String = ""
var letterIndex = 0
for i in 0..<wordLength {
    letterIndex = remainders[i] - (remainders[i+1] * 37)

    let lettersStringIndex = letters.startIndex.advancedBy(letterIndex);
    resultString.append(letters[lettersStringIndex])
}

reversedString = String(resultString.characters.reverse())
return reversedString

// Becomes

for i in (0..<wordLength).reverse() {
    let letterIndex = remainders[i] - (remainders[i+1] * 37)
    let lettersStringIndex = letters.startIndex.advancedBy(Int(letterIndex));

    resultString.append(letters[lettersStringIndex])
}

return resultString;
We can also notice that the original implementation's reverseHash function actually does several things:
- Computes the array of remainders from the given hash number
- Decodes the remainders to a String
- Reverses the String
In our above changes, we've eliminated the need to reverse the string, so we can break the reverseHash function into just two steps to make the process easier to reason about:
func reverseHash(hashNumber: Int64, wordLength: Int, hashKey: String) -> String {
    let remainders = computeRemainders(hashNumber, wordLength: wordLength)
    let resultString = decodeRemainders(remainders, wordLength: wordLength, hashKey: hashKey)
    return resultString
}
We've also parameterized the reference to the hash key above as hashKey. We're simply passing it the same string as in the problem statement: acdegilmnoprstuw.
Now that the hash key is parameterized we can also take advantage of the Swift compiler's ability to create "curried" functions (partially applied functions) to create a new function that simply accepts the hash number:
func reverseHashGen(wordLength: Int, hashKey: String) -> (Int64) -> String {
    return {(hashNumber: Int64) -> String in
        return reverseHash(hashNumber, wordLength: wordLength, hashKey: hashKey)
    }
}

// Usage

let problemReverser = reverseHashGen(8, hashKey: "acdegilmnoprstuw")
let reversed = problemReverser(25377615533200)
To see all the changes, view the pull request created under the Denver Swift Heads fork of the project.
Aside - MVVM Refactor
In a complete yak shaving maneuver, I decided to refactor the app (with its single view controller) to use an MVVM pattern. I haven't had much experience using this pattern for iOS (shamefully using the massive view controller pattern) so this was a nice test project for myself to convert.
The process was fairly simple. I followed the Intro to MVVM article's advice to, as a first step, simply call the model from the view controller directly. Then the creation of the view model actually moves the model from the view controller to the view model. Doing the refactor stepwise like this makes it easy to transition and reason about what logic and state you're moving, and where you're moving it.
To lay the groundwork, I started by replacing the updated reverse hash implementation and then splitting it out into its own struct.
Next came implementing a model and calling it from the existing view controller. Finally implementing the view model to own the model and make the view controller rely on the view model for all logic.
Refactor Results
Overall this MVVM refactor was fairly simple using the outlined procedure. I felt it was natrual to approach the refactor in this way, and I do feel like the resulting project is fairly easy to reason about.
The view controller is now fairly dumb, in that it simply relays events from the user to the view model, and presents information returned by the view model. The view model still relies on the reverse hash implementation from the struct that was originally split out, so even it is not overly complex. The model itself is represented as an immutable struct, so the state is left to the view model to manage.
What I did lose in this refactor is Vui's original error checking features, but that should be relatively easy to add to the view model in the future (relying on the .Error enum case) without a change to the hashing utility or the view controller.
Summary
So what did we learn in this exercise? Personally I feel like I learned most about idiomatic Swift style from both the Apple docs and the excellent Ray Wenderlich Swift Style Guide. I attempted to apply what I personally know to be idiomatic Swift, but I realize Swift itself is a moving target so even this refactor might be outdated. Please feel free to correct me and fork the repo as needed, we're all in this Swift 🚣 together.
In addition to applying Swift style, hopefully the MVVM refactor is a useful illustration of taking an existing Apple-style MVC app and transitioning to an MVVM pattern. Again, this is my understanding through my own lense of the MVVM pattern, so feel free to correct me and fork as necessary.
Overall though, this was a great exercise to get back into iOS Swift for a spell. I've spent the last several blog posts neck deep in Swift on Linux and server side Swift, so it was a nice change of pace back to the good old iOS platform. Using Swift on iOS and in Xcode feels much more first party and stable than using it in Linux, and the resulting iOS app is a nice tangible UI instead of some text printed to a console!
Finally, I'd like to give another shout out 📢 to Vui for the presentation and the original implementation. Thanks Vui!
